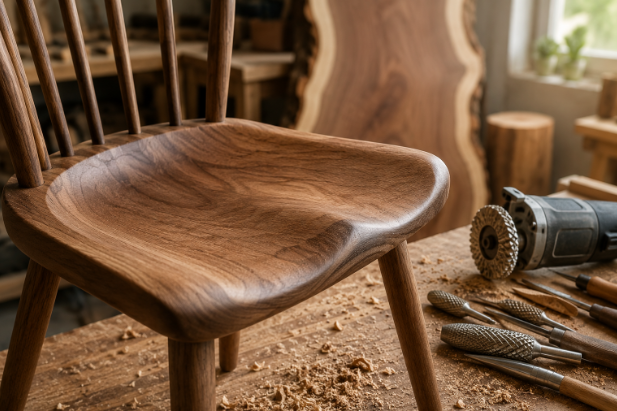
A well-made wooden chair is more than a collection of joined boards. Its comfort depends heavily on how the seat supports the body, distributes pressure, and transitions into the surrounding edges. This is why sculpted seating has become such an important part of contemporary furniture making. Instead of leaving a chair seat completely flat, makers can remove material strategically to create a shallow, ergonomic hollow.
One of the most practical ways to achieve this is through saddle seat carving, a technique that combines controlled stock removal with careful shaping and refinement. Power carving tools, hand rasps, contour wheels, and abrasives can all play a role, depending on the depth, wood species, and desired finish. Power carving is particularly useful in furniture making because it allows makers to develop seat contours, soften transitions, and create ergonomic forms after the main parts have been cut and assembled.
What Is Saddle Seat Carving?
Saddle seat carving is the process of sculpting a shallow concave form into a chair, stool, or bench seat so that it follows the natural shape of the person sitting on it.
A flat wooden seat concentrates pressure on relatively small contact areas. A properly carved saddle distributes that pressure more evenly while providing subtle support around the hips and thighs.
The goal is not simply to create a dramatic hollow. Effective shaping usually involves gradual transitions so there are no uncomfortable ridges or abrupt changes in depth.
Furniture power carving tools are particularly useful for this type of work because they allow direct control over depth of cut, ergonomic shaping, smoothing, and complex curved transitions.
Start With the Correct Seat Layout
Before removing material, establish the seat’s basic geometry.
The centerline should be clearly marked so both sides can remain reasonably symmetrical. Makers can also mark the deepest portion of the seat and define areas that should remain untouched, particularly around joinery or thinner edges.
During saddle seat carving, it is generally safer to approach the final depth gradually rather than trying to remove all the waste immediately.
Frequently checking the surface from different viewing angles helps reveal uneven areas. Templates, flexible curves, or simple reference lines can also help maintain consistent contours.
The exact seat shape does not have to be perfectly symmetrical, especially in handmade furniture, but the finished form should feel balanced when someone sits on it.
Choose Tools According to the Stage of Shaping
Different tools are useful at different points in the process.
For rapid stock removal, shaping or dish-style wheels used with an angle grinder can remove larger amounts of wood efficiently. Contour wheels are useful for creating hollows, rounded edges, and sculpted recesses, while rotary burrs provide greater control in smaller areas. Hand rasps can then refine transitions and remove irregularities manually.
The referenced furniture tool selection includes shaping wheels, contour wheels, burrs, and hand rasps intended for both shaping and refinement.
For saddle seat carving, tool choice should reflect the amount of material being removed. An aggressive cutter may be appropriate early in the project, while finer tools are preferable as the surface approaches its finished form.
Pay Attention to Grain Direction
Wood grain affects how carving tools interact with the surface.
Cutting aggressively against difficult or changing grain can cause tearing, grabbing, or an uneven surface. Curved furniture components are especially challenging because grain direction can change as the tool moves across the seat.
Power carving allows furniture makers to control grain direction and depth more directly while shaping complex forms.
When working on saddle seat carving, changing the angle or direction of approach may produce a cleaner cut in difficult areas. Hardwoods such as walnut, maple, cherry, oak, and mahogany can all be power carved, although their hardness and grain characteristics influence how quickly material can be removed.
Develop the Shape in Gradual Stages
A useful carving sequence typically moves from rough removal toward increasingly fine refinement.
The first stage establishes the main hollow. The second blends this depression into the front, sides, and rear of the seat. Later stages remove tool marks and refine areas that will make direct contact with the user.
The transition between the deepest point and the outer perimeter is especially important. Abrupt slopes may look sculptural but can become uncomfortable during prolonged sitting.
Power carving works well at this stage because furniture tools can be used to refine seats, soften contact surfaces, blend curves, and fine-tune comfort.
Test Comfort Before Final Sanding
One of the advantages of handmade furniture is that its form can be evaluated before the surface is completely finished.
After the primary saddle seat carving is complete, the maker can carefully test how the seat feels. This can reveal pressure points that are difficult to detect visually.
Small adjustments to the front edge, side transitions, or deepest area may produce a noticeable improvement in comfort.
Final sanding should therefore come after the major ergonomic decisions have been made. Sanding is highly effective for smoothing, but it is inefficient for correcting substantial shaping errors. Power carving removes material intentionally, while sanding is better suited to refining an already established form.
Don’t Remove Too Much Material
One of the most common risks in sculptural woodworking is over-carving.
Once material has been removed, restoring the original thickness is difficult. This is particularly important when the seat contains joinery, fasteners, or structural areas that rely on sufficient wood thickness.
Marking depth limits in advance can reduce this risk. Makers should also consider how the seat connects to legs, stretchers, or other structural components before creating a deep saddle.
The most successful saddle seat carving often involves restraint. A relatively subtle depression can significantly improve comfort without compromising the chair’s structural integrity.
Use Similar Principles Across Sculpted Furniture
The skills used to carve a comfortable seat also apply to many other furniture-making tasks.
Power carving can be used to shape armrests, chair backs, rounded transitions, handles, cabinet details, table edges, and laminated curves. Furniture makers commonly use it to move beyond flat surfaces and introduce organic, tactile forms.
The same principles apply throughout: remove material gradually, observe grain direction, maintain control, and refine the shape progressively.
Conclusion
Creating a sculpted wooden seat requires a balance between visual design, ergonomics, material removal, and structural awareness. Successful saddle seat carving begins with careful layout, continues through controlled rough shaping, and finishes with gradual refinement and comfort testing. Woodworkers developing related furniture skills such as live edge shaping can apply many of the same principles, including respecting grain direction, using progressively finer tools, and maintaining smooth transitions between natural and deliberately sculpted surfaces. Ultimately, the best carved seats are not defined by how much material has been removed. They succeed because every curve has a purpose. By working gradually and focusing on comfort as much as appearance, furniture makers can transform a flat board into a seat that feels intentional, supportive, and distinctly handcrafted.
